jQuery Accordion: add hash to URL, send Analytics event on open

Recently I had an intense project launching a buddy’s site in Hubspot on a short timeline. Along the way, we created an FAQ page, the Custom Module for this accordion uses jQuery UI Accordion (https://jqueryui.com/accordion/), and so the tricks in general apply far and wide, I think.

The goal:

  • add a URL hash (https://thesitename/faq#thisistheahash) when a question is clicked open, and remove it when closed. Primarily so someone can copy a link to the page with that hash in it
  • make the accordion open if someone comes to the page with the hash in the URL, like if it were emailed to you that way
  • send Google Analytics event data when the question is opened so we can get a sense what questions people are really concerned with.

Just so you know the HTML that gets written out for each accordion item is more or less like this (I simplified it from the actual output in Hubspot):

<div class="accordion" data-url-hash="how-long-does-it-take-to-get-started" role="tablist">
<h4 class="ui-accordion-header" role="tab" id="ui-id-1" >How long does it take to get started?</h4>
<div class="ui-accordion-content" id="ui-id-2"> ... expanded content in here ... </div>

These refer to the code below…

Line 2 is just to keep this action happening only on the FAQ page. Unlike WordPress, in Hubspot I can’t just ask the server what page I’m on (I think).

jQuery UI has an Accordion function,  what was already in use on this Custom Module. It’d be easy to wire up yourself if your theme or site is not already using it. In this case the wrapper <div> has a class ‘accordion’ that’s what activates the expanding/contracting. So I’m just checking for click event on that same div.

In the Custom Module, which is where I define the simple HTML of the accordions, I assigned a value to the data-attribute: ‘data-url-hash’ and have it as lower case, no spaces (dashes instead). When the FAQ accordion is expanded it gets a class ‘ui-accordion-header-active’ (by jQuery UI already) so I just check for that and then using plain javascript write the hash into the URL.

Also, while I’m at it, I defined a Google Analytics event trigger to send information about this FAQ Question. We should see those events in the coming days and I’ll update with a note about it. But I checked that it was firing using a google analytics debugger for Chrome.

Then, I wrote a simple function to clear the hash when the accordion is closed again.

Next,  I had to deal with the case when someone comes to the page and has the hash in the URL already I want to trigger it opening the appropriate accordion. Since I have the data-attribute to work with I run a jQuery filter to find the div.accordion that has that attribute match, and then activate the accordion. In order to get the hash there’s a hand javascript function, but I have to strip out the ‘#’ on the way or it won’t match with my data-attribute.

This is the page where it’s in action: https://www.bigsis.com/faq/ Here is the whole shebang. It’s late so I don’t have time to write the instructions along with the lines themeselves like a better blogger, but maybe I will come back to it if I have time. This all, by the way, is wrapped in a document.ready, and is in a customJS file I have saved in my coded files in Hubspot. It’s key to load the script in the footer, or at least AFTER jQuery, and jQuery UI, AND the accordion instantiation happens.


//get URL and hash for FAQ page
if(window.location.href.indexOf('faq') &gt; -1){

//get clicked or opened FAQ then add a hash to the URL
  $('.accordion').click(function(){
  var dataUrlHash = $(this).data('url-hash');
  var header = $(this).find('h4');
  if(header.hasClass('ui-accordion-header-active')){
    window.location.hash = dataUrlHash;
    ga('send', 'event', 'FAQ', 'Open', dataUrlHash);
  } else{
    removeHash();
  }
});

//check if url has a hash, open accordion...
if(window.location.hash) {
  var urlHash = $(location).attr('hash').replace('#', '');
  $('.accordion').filter(function(){
    return $(this).data('url-hash') === urlHash;
  }).accordion("option", "active", 0);
}

//toggle off the hash when an open accordion is clicked
function removeHash () {
  history.pushState("", document.title, window.location.pathname+ window.location.search);
}

Update: Nikon D800 and Cineflat profile, Neat Video de-noiser

EDIT/UPDATE: I finally plunked down for a Sony A7rii about 4 months ago. I’m a loyalist still, I foresee this as a kind of temporary departure from Nikon. That said, some time ago, I actually decided the Cineflat was a little TOO flat, and I took the ‘Flat’ profile from my partner’s D810 and did the same trick- loading that onto the D800. I can post a zip of that profile if anyone wants to try that. It was a little more ‘natural-looking’ flat and maybe less work to grade. Also, I’m going to start using DaVinci resolve for grading, soon. A reader commented that they were having trouble installing… I think it’s important to format the SD card, put only the profile on there in a folder called NIKON, then you can select it to load. Cheers! – MF 4/19/18

I lust over my friends’ work with RED cameras, or Sony FS7’s or even Arri cameras. The stuff is incredible, especially when they put them on a Movi or up in the air! At the moment, a Sony FS7 would be a massive investment I can’t make.

So I’ve made an effort to make the most with what I have, which is a Nikon D800. My business partner has a D800E and a D810, so we’re basically shooting the same equipment. Some of our bread and butter work is shooting video  for architectural or high end real estate listing videos. These often happens in nightmare situations shooting indoors with bright windows. Also, we are trying to push our aperture as small as possible to increase depth of field and the ISo has to shoot up to accommodate. As a longtime still shooter who shoots everything in RAW, I have tended to ignore the color profile settings in my camera. The video footage I was getting however, was driving me nuts… dark shadows with lost information, blown out highlights, nothing I could do to balance it satisfactorily.

Get and install Cineflat on your D800/E/810

After some research, I found Cineflat, a custom profile for Nikon. Here an informative article by the folks behind it. If you want to just read my little description and get right to it, here is the download. To get this into action,

  • download that zip,
  • extract/expand it on your computer
  • put the extracted folders (keeping the structure) on an SD card
  • Put that card in, and go into the menu to Manage Picture Control (in the Shooting menu)
  • Choose ‘Load/save’ then ‘Copy to camera’ and select the new profile.

To use it, go back out to the Shooting Menu, and choose Set Picture Control and choose the Cineflat.

The results:

For a quick explanation of why this is needed… even though the D800 shoots wonderful RAW still images with impressive dynamic range, the video is highly compressed. This is essentially like shooting JPEGS with a severe compression and ‘look’ applied. I have been shooting Standard since I got it, and outdoors I haven’t worried about it, but indoors the images suffer greatly. The Neutral is a little better (and the D810 has a ‘flat’ profile that is still not as optimized as Cineflat). In any event, what you get when you bring this into Premiere Pro and try to grade it, there’s little room to work with it. If you try to bring up the shadows or play with the curves it turns into a mess. So what CINEFLAT does is to apply a carefully constructed curve that preserves detail in the shadows and in the highlights, leaving a wonderfully flat image to grade with the tools in Premiere or other grading software.

I have to shoot 23.976 footage with my D800, and therefore I shoot video at 1/50 shutter speed (you want to be as close to 2x frame rate with your shutter speed). I did  a quick and dirty test in my kitchen to show the same shot with 3 different profiles at exactly the same settings.

Of course, the CINEFLAT looks hazy, milky, or well, ‘flat’. But now I will take this into Premiere and apply some adjustments to bring back some contrast and depth. The important thing is I have information in all the areas of the image to work with!

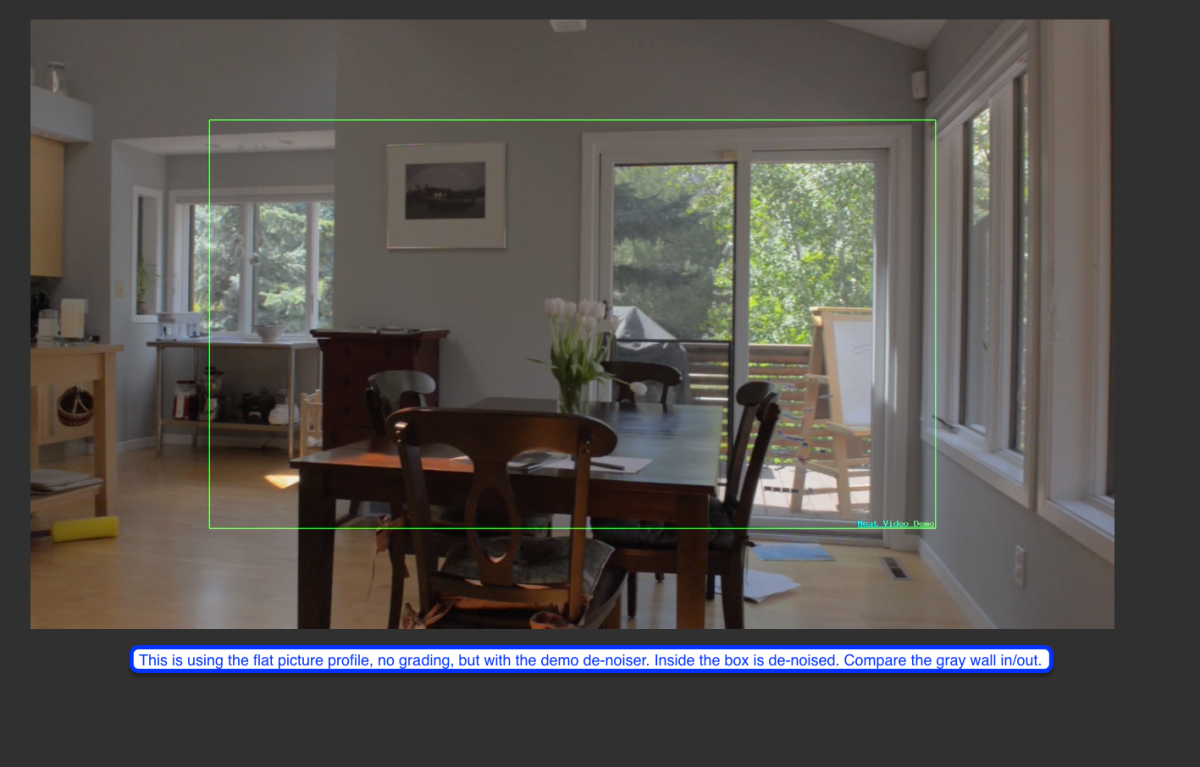
D-Noise with Neat Video

The noise in the video I get out of my D800 is also a little embarrassing. When shooting at small apertures, trying to keep sharp focus throughout, the noise gets worse and worse. So I checked out Neat Video and ran a test. I’m buying the Pro version as I write, but here is the demo version test, showing the de-noised video inside the green box.

NeatVideo-Test

Launch a lightbox pop up from a menu link

I had a few clients who needed to launch some pop up lightbox content from a link on the site. In this case it was a menu item. I was using a child theme of Enfold in both cases, which I know already has Magnific Pop up in it so I wanted to simply leverage that. Here’s how it went. If you don’t have Enfold as your theme, you can get magnific (or another lightbox system) and do a similar thing.

This is one of the sites: bluboxrooms.com. Notice the Contact link in the menu, it launches a popup lightbox with their MailChimp signup in it.

In the functions.php file, put some code to tell the site to use the rel tag to activate the magnific (the first snippet) and then write a function to create the content that will pop up.


//Pop up handler
add_action('wp_head','enfold_customization_add_magnific_handler');
function enfold_customization_add_magnific_handler() {
	?>
	<script type="text/javascript">
	jQuery(document).ready(function() {
	    jQuery('a[rel=magnific]').magnificPopup({
	        type:'inline',
	        preloader:false,
	    });
	});
	</script>
	<?php
}

function add_popup_content(){ ?>
     <div id="popup" class="white-popup mfp-hide lightbox-added">
          <!-- HTML of Pop up Here --!>
     </div>
<?php }
add_action('ava_after_main_menu', 'add_popup_content');

Inside the #popup div, I pasted the HTML of the MailChimp embed code, which I tweaked and styled to suit the site. On another site, that was simply an image with a link to one of their other pages (where they were doing a giveaway/signup). You could also show an iframe in the pop up of course. In the case of Enfold+Magnific, it’s important to have the classes on the #popup div to work properly and that’d be true of prettyPhoto or another lightbox too.

Child Theme – it’s easy! and necessary

If you are building a serious WordPress site, it’s likely you have bought a good theme, either because it looks good, or is easy to use or both. I’m a fan of Enfold, I like the visual page builder than the others I’ve seen, and I know that handing it off to clients who don’t spend their days on Stack Overflow evaluating code snippets.

Your theme, if it’s good, will be getting updated from time to time, and you want to protect whatever customization you make to the theme. Therefore, a child theme is essential. Luckily, it’s so friggin easy.

Part One, super easy:

Steps (I do this in my sleep now for new projects):

  • get set up with FTP access to your site
  • make sure your parent theme is there, and note the name of the folder it is in. The folder name is important here not the name in the heading of the stylesheet.
  • in the wp-content > themes folder, create a new folder for your child theme. I usually name it for the client and the year, so we can track how old it gets, so something like “clientname2016”
  • In that folder create two files: “styles.css” and “functions.php”

Put a header in the style.css file that looks like this. It needs a minimum of 2 things: the child theme name, and the template (parent) theme name, but if can have more lines in it (see below).

 /*
Theme Name: Client Name 2016
Template: twentyfifteen
*/ 

Put this in the functions.php file:

&lt;?php
add_action( 'wp_enqueue_scripts', 'theme_enqueue_styles' );
function theme_enqueue_styles() {
    wp_enqueue_style( 'parent-style', get_template_directory_uri() . '/style.css' );

} 

Now you can go back to your WP Admin dashboard and activate the child theme you made. You can, of course, but in a .png as a preview for your themes page, and of course take off and running with your customizations.

Part Two, get off and running…

The child theme allows you to make modifications to your theme without being affected when you update the parent theme. Adding CSS to that styles.css file will override parent theme styles, and functions added to that functions theme will be added to the parent functions used in the site.

Furthermore, files you add to the child theme folder will replace the ones in the parent. For example, if you want to customize the header.php you can copy the one in the parent, and paste it in the child theme in the same relative position. Feel free to edit the file, changing php and html code as you wish. More complicated themes often have various template parts or files in subfolders, and once you identify one you need to modify, set up the same structure in your child. Say, in a folder called “includes” there is one called “helper-main-menu.php”. Simply create a folder in your child theme called includes, and paste that file in it, then hack away!

Adding page name to the body classes in WordPress

I seem to always have to remind myself of this one… whether it is someone else’s theme I’m dealing with, or an Underscores starter, or for whatever reason the body classes seem insufficient, I always like having the page name in the body classes. This makes it easy to target something that may need to happen on a particular page, and safeguards against the client deleting and re-establishing that page. In any event, if you need the same this is a simple fix. The body_class() function can be filtered and elements added to the array there. You can of course use the page slug or any other detail from the $post object.

//Page Slug Body Class
function add_body_class( $classes ) {
global $post;
if ( isset( $post ) ) {
$classes[] = $post->post_name;
}
return $classes;
}
add_filter('body_class','add_body_class');

PHP copyright and current year

Often in the footer of your site you want to write something like: “© 2015 Mick Follari”. But you also don’t want to have to remember to go change it every year, or to teach your clients how to do it. Another thing I found this useful for is in one case I had a client I needed to have an image header with the year built in to it, like “2015 Adventure Film Festival”. I pre-made 5 years of headers and gave them names with the year in them and used the PHP year in the img src filename so they would automatically update on Jan 1.

Many people just want this snippet:

&copy; <?php echo date("Y"); ?>
&copy; <?php echo date("Y").' -YourNameHere'; ?>
&copy; 2012-<?php echo date("Y").' -YourNameHere'; ?>

The first displays just the year, the second adds your name or company, the third shows a range (like “© 2012-2015 Mick Follari”).

There is a long list of arguments you can use to configure the date if you’d rather more than just the year. Here’s the index.

This is a pretty basic thing, but I find people are always asking or looking up how to do. Since most of my sites are in WordPress, I’ll mention first that you should create a Child Theme, then alter the footer.php from your Parent theme in there. If you need to learn more about Child themes there’s plenty out there (and I’ll make a new blog post about it), but start here.

Once you have your Child Theme, copy the footer.php from your Parent theme into the new folder, and start editing the place where it shows the copyright. If the Parent theme is using a filter or hook to write in the copyright, then you only need to unhook that function, and write your own to replace it. That’s another post…